W E L C O M E !

All the items shown here are lovingly handmade by yours truly :) Each and every piece is one-of-a-kind and I normally do not remake them. These items make very unique gifts!

I will be updating the blog as frequently as I can, whenever time permits. So do drop-by often :)

If you have any questions, please do not hesitate to email me at amy_lim60@hotmail.com

Thank you so much for your visit!

All artwork and content Copyright © 2006 - 2014 Nicely Created For You.


Showing posts with label tutorial. Show all posts

Friday, April 26, 2013

FREE CROCHET PATTERN - Small Square Coin Purse with key ring and clasp

Materials:
* Worsted weight acrylic yarn
* 4mm crochet hook
* 0.875 inch button
* Swivel clasp  with split ring
* stitch markers (I used scrap pieces of yarn)

Abbreviations:
ch chain
sc single crochet
rnd round
blo back loop only
flo front loop only

Size of finished purse: 2 x 2 inches/5.08 cm square


Instructions: 

Rnd 1: Chain 11. Work 10 sc across, placing a stitch marker on the first sc. Continue to work 10 sc on the other side of the ch. Total = 20 sc.

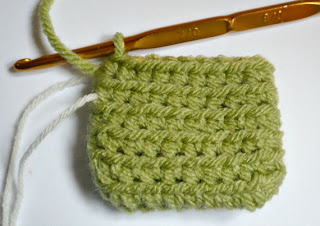
Rnd 2 to 6: Sc on  blo. Each rnd will have 20 sc. (please see below pic)


Purse with the first 6 rnds of crochet.
 

Rnd 7: Work first 2 sc on blo, work next 3 sc on blo and attaching the split ring simultaneously, then sc on blo for the remaining stitches.  Total 20 sc. (please see below pic)

Key ring attached on rnd 7.


Next, we are going to crochet the cover flap.  From here onwards, the piece is worked in rows.

Row 1: Work 10 sc on blo. Ch 1 and turn the piece.
Row 2: Skip first sc. Sc next 8 sc on flo. Place a stitch marker here to mark this row for easy identification later. Ch 1 and turn.
Row 3: Work 8 sc on blo. Ch 1 and turn.
Row 4: Work 8 sc on flo. Ch 1 and turn.
Row 5: Work 2 sc on blo, ch 3, skip next 4 sc, sc on blo of last 2 sc. Total 7 stitches. Ch 1 and turn. (The buttonhole is created).
Row 6: Work 2 sc on flo, work 3 sc into the buttonhole loop, work last 2 sc on flo. Ch 1 and turn. (please see below pic)
 

Cover flap completed.


Next, we are going to create the border stitches on the cover flap -

Work 7 sc on the top long edge. For the first short edge, work 5 sc spacing them out evenly. For the bottom long edge, work 8 sc on the remaining blo of the previous row 2 marked with stitch marker. For the second short edge, work 5 sc spacing them out evenly.  Slip stitch to next stitch to end.  Fasten off yarn and weave in ends. (please see below pics)

Working the border stitches on the cover flap of purse.


 Completed purse before attaching button.


Lastly, attach the button to the centre of the purse. Please see below pics for the completed item.

Front


Back


Lying flat

 I hope you have enjoyed this free pattern :) Do not hesitate to contact me should you have any questions.


Thursday, August 9, 2012

FREE PATTERN - Simple Crochet Flowers


These crochet flowers  are so quick and easy to make and they can be made into brooches, hair clips, wrist corsages, pendants or as embellishments on beanies, hats, hair ties, headbands, chokers, bags, purses, cardigans, shoes, slippers, booties, etc...

The blue flower on the left is crocheted with Red Heart Stardust superfine yarn.  It measures about 2.25 inches/5.72 cm across.  The peachy-pink flower is crocheted with a laceweight/fine acrylic yarn (18wpi) and it has a diameter of about 2.75 inches/6.99 cm.

For both flowers, I used a Clover Soft Touch crochet hook size #3 ( 2.25mm).

Let's get started!

Materials:

* Main Color Yarn
* Contrasting Color Yarn - for the base disc of the flower
(You can crochet the whole flower in one color if you prerfer).
* Crochet hook
* Yarn needle
* stitch marker
* Scissors

Abbreviations:

* Ch - chain
* Sc - single crochet
* Sl st - slip stitch
* Rnd - round


Instructions:

 
Start with the contrasting color yarn for the base disc of the flower. Use a stitch marker to mark rnds.

Rnd 1 : Ch 2. Work 6 sc in second ch from hook. (6 sc)
From rnd 2 to rnd 5, crochet in back loops only.
Rnd 2: Work 2 sc in each sc around. (12 sc)
Rnd 3: Work 2 sc in each sc around. (24 sc)
Rnd 4: [Sc in the next 2 sc, 2 sc in the next sc] 8 times. (32 sc)
Rnd 5: [Sc in the next 3 sc, 2 sc in the next sc] 8 times. (40 sc)

At the end of rnd 5, sl st to top of beginning sc and fasten off yarn. Weave in ends.


- front of flower -
Join main color yarn to the centre of the flower with a slip knot, on the first front loop. 


- front of flower -
Ch 1 and sc in the same first front loop and in each front loop around. You are actually working in a spiral.


- back of flower -  
At the end of the spiral, ch 2 and turn your work to the back side. Sc in first sc. [Ch 2, sc  in next sc] repeat around.  


- back of flower -
Once you reach the centre of the flower, fasten off yarn and pull tail yarn through the centre hole and to the back of the flower. Weave in ends. Your flower is completed :)
     

I hope that you will enjoy this pattern!  :)   All comments and questions are most welcome!


Wednesday, May 16, 2012

FREE PATTERN - Crochet Flirty Petal Bracelet


Materials

* crochet hook 3.5mm
* worsted weight yarn (I chose GREEN as the main color and CREAM for contrast)
* one button about 1 inch/2.54 cm in diameter
* yarn needle 

Abbreviations
* Ch - chain
* Sc - single crochet
* Sc2tog - single crochet next two chains together


Instructions 

 
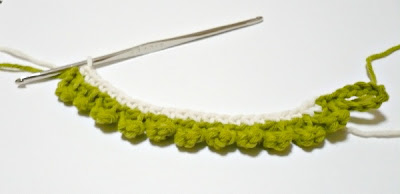
1) With green yarn and 3.5mm crochet hook,  (ch5, sc2tog twice), forming the first petal.  Repeat ( ) for as long as is required for the length of the bracelet. My bracelet measures 5.5 inches/13.97 cm long, consisting of 11petals. Remember to make this bracelet just fitting your wrist at this point since we are going to add a button loop which will increase the length of the bracelet slightly.


2) Continue to ch10.  Bring the chain back to the starting ch and slip stitch into the first starting ch, forming the button loop. 


3) Join cream yarn.  DO NOT cut off the Green yarn yet. Sc along the edge of the green crocheted piece evenly, right to the end. Cut off the cream yarn and weave in all ends.


 4) Go back to the green yarn still attached. Now start to slip stitch in each cream yarn sc, right to the end.  Cut off the green yarn, leaving a tail of about 8 inches.  Thread this tail yarn onto a yarn needle and attach a button onto the piece.
Weave in all ends.


 Finished Bracelet :)
 

Wear your handcrafted Flirty Petal Bracelet with Pride! :)

Please do not redistribute/sell this pattern or post it anywhere online.  You may link to this blog post if interested :)  Thank you!

** An original design by Amy Lim (Copyright © 2012 MelbaShoppe) **